Showing posts with label Card. Show all posts

Friday, November 15, 2013

60th Birthday Card - Easel Card

Hi all! I know it has been a long time since I have posted. I haven't had much craft mojo going on :(

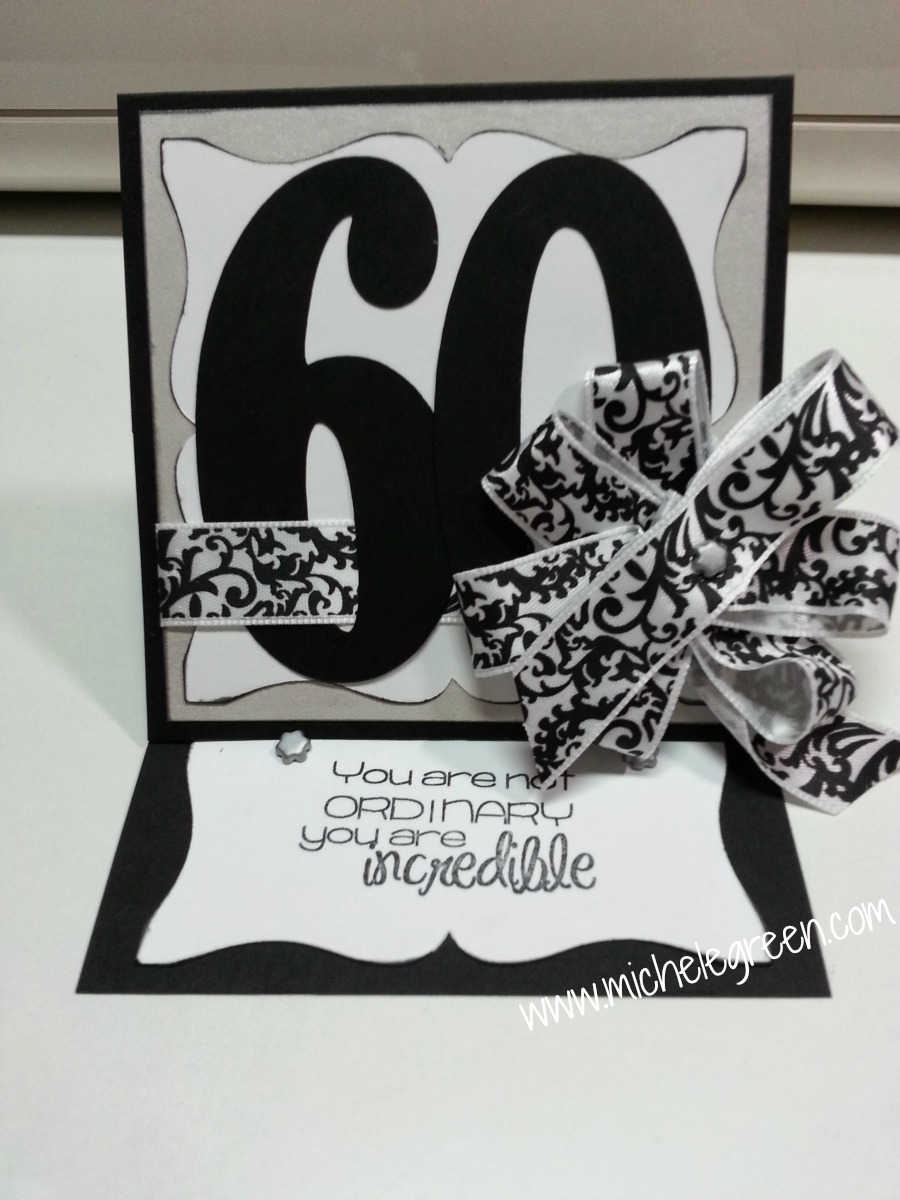
Today is my day over at CricutDIVAS and I am sharing the first easel card I have ever made. I LOVE it! These are so easy to make and a lot of fun to design! This card celebrates the 60th birthday of a very special woman, my mom.

 The card measures 4"x4". It started with one 4x12" piece of black cardstock. The simplest directions for an easel card can be found HERE. From there I knew I wanted to use paisley so I stayed with silver, white, and black for my card. The white background shape is cut from Paper Trimmings at 3". The 60 is from Theresa Collins Sophisticated cart at 3.25".
  Image
 I threaded this Recollections Paisley ribbon through the numbers to bring the whole card together. I created the bow by using a brad and poking it through the ribbon as I folded it over. I used glue dots to adhere it to the page and also in between a few of the layers to get it to lay right.
  Image
 When you open an easel card, there will be a space that you can only see when the card is all the way open and a place that will be part of the display. It looks like this when all the way open:
  Image
I chose to use the upper portion to write my sentiment and the bottom portion, which will be displayed to put this awesome Pink by Design stamp! You then put a brad or button or something to hold the top portion of the card up. Mine looks like this:
  Image

And from the side an easel card looks like this:
  Image

 I hope you have enjoyed this card - I did! :) Easel cards are much easier to make than they appear so I suggest you try one if you never have! I know I waited way to long to try this myself!

Monday, May 6, 2013

LOAD6 - Fishing

For LOAD513's sixth prompt of "red herring" I went with a fishing layout.  I have so many pictures of our family out on the boat. I always make sure to have the camera with because you never know when that giant fish might come along!


This printed paper is Gone Fishing Collection Caught B by Carolee's Creations.  It was originally a one piece 12x12 that looked like this:

I cut it and used a matching blue cardstock to expand it into enough for a two page layout. The mini title pieces are from the Fishing Adventure sheet in the same collection.

Today was also my day over at CricutFANatics so be sure to check out this baby card there!

Sunday, April 21, 2013

Basketball Card

Hi!  I am so bad at remembering to share my work on my own blog!  April 6th I shared this basketball birthday card over on Cricut FANatics.  I made this for a nephew.  Hope you enjoy!

The basketball hoop is from the All Sports cart. 


Tuesday, March 26, 2013

Easter Mini Album and Cards

Hello! I was recently in an Easter swap and one of the requirements was to send at least one homemade item.  Here are a few that I made, one Easter mini album and two Easter cards. 

The mini album:


The base egg shape is from the Cricut Circle exclusive cart, Sophie. 


Page through the album with me.  Because I was making this for someone else, I left it pretty blank inside so that it could finish being customized by the recipient.  Easter is celebrated many different ways so I didn't want to go on and on about say, an egg hunt, when there are no egg hunts in their family. 

Page one:

Page two: 

Page three:
The yellow flower is the negative cut from the front cover. 

Page four: 

Page five: 
The yellow swirl is also a negative cut from the front cover. 

The back cover: 
Everything is inked brown and lots of ribbon on the clasps that are holding the album together. 

The cards that I also included in the swap: 


These cards are cut from Spring Holiday Cards at 4". 


The lamb is flocked and so cute! 


The little chick poppin' out of the egg: 


Happy Easter to all of you!  I will be back to post more details about the mini, including pictures of each inside page. 


Saturday, March 23, 2013

Holy Cow card

I just received the Animal Antics Cricut Cartridge in the mail and was so excited to use it.  I hadn't spent time looking at the booklet or anything so I didn't know exactly what this cart was going to be.  I needed to make a birthday card for my niece so I thought it would be the perfect time to try it out.  As I was flipping through the book, I came to the cow - the holy cow.  To me, this is hilarious! Here he is:


The background is the phrase at 2.5" "cut" with the Cricut Markers.  I used the line return button on my Expression to get it to line up perfectly.

Here is a close up of the face.  Something a little different about this cart is how many layers there are to get the final look.  Look how many you can see in the face!


I finished the inside of the card with "It's your birthday" printed from my printer and "Have a moo-velous day" stamp from My Pink Stamper, simply because I couldn't resist yet another pun. :)


Have you tried your cart yet?  Do it!

Thursday, November 29, 2012

It's Your Bird-day!

My mom celebrated her birthday this past month.  She is a beginning card maker/scrapbooker and so I wanted to create a card for her that used lots of techniques.  Here it is! 


I used a Cuttlebug embossing folder in the background to give it the illusion of clouds.  I used patterned paper for the cupcake liner, Martha Stewart fringe scissors to make the grass, inking on the cloud, and pop dots for dimension.  Here's a close up of some of that:


The bird is from 3 Birds on Parade Cricut cart, cut at 3.5".  

She enjoyed this card and I wish all of mine would turn out like this! 

Thanks for visiting me today! 

Saturday, October 6, 2012

Falling for Halloween Blog Hop - Day 1

Photobucket 
Welcome to the Falling for Halloween Blog Hop!  This is a two day hop focused on both fall and Halloween.  You should have arrived here from Sara Andrews' fabulous blog. (I really love her layouts!!) If you missed the beginning of the hop, please go to Maria's blog to start so you don't miss any of the projects.  If you have been following along, you have made it to the last stop! Phew! 

Today I am sharing two cards with you, one fall and one halloween.  Tomorrow I will be sharing cute mini Halloween bags!

I was recently in a Fall Swap on the Cricut Message Boards and I made my partner these two cards.  First up is a Thanksgiving card, although it could totally be a thank you card sent in the fall too! This is the phrase button of < NatvBear >.  I cut it at 4 inches and used brown cardstock as the base. The acorns are from the < Squirrel > accessory button.  


Everything is inked over in brown to give it that fall feel.  (I apologize for the pics, I used my daughter's camera and do not like it as much as mine!)

The second card is a Halloween card, also using the phrase feature, this time from the < WitchOwl >.  The spider web is from the < Pumpkin > accessory key.  I flipped it so it goes the right direction for my card.


I started out with the entire phrase but as I was assembling, I wasn't sure if I liked the bold orange of the "happy" so I left it off.  Here it is though, as it would be an easy addition right above "Halloween". 


Both of these cards are entirely from the Create a Critter 2 cart but use no animals!  I love doing projects entirely from one cartridge.  Maybe I'm just not good at mixing and matching!  :) 


Now that you've made it through the post, how about some blog candy?? Yeah!  I will choose one winner to receive a Halloween mini stamp set, some jewels and a $10 Michael's or JoAnn's gift card - you pick!  To be entered to win, leave a comment below and be sure to include your email address or Cricut MB name so I have a way to contact you!

Thanks so much for joining in our hop today!  Stop by again tomorrow for another round of great crafting!  

Here's the entire list of blog hop participants in case you need it:


Thursday, October 4, 2012

I Love You Because...

I created this wedding shower gift for a woman I work with.  She is very sweet and when I saw this frame idea, I knew she would be a perfect fit for it. 

I saw the idea for an "I love you because..." frame HERE at A Content Housewife.  She gives great directions on how to make this cheap and easy gift.  The hardest part was picking out a frame!  This is an 8 x 10 frame from Hobby Lobby. 


You use a dry erase marker on the glass of the frame to finish the sentence and leave it in a place that your hubby is going to find it.  Hopefully he writes a message back to you too! 

I made a coordinating card to go with.  I used a matching piece of the silver damask cardstock I cut for the frame to create this easy 4"x4"card. 


To stamp on the ribbon, I used StazOn ink.  I find that works the best because it doesn't wipe off like some of the other inks I have tried doing this with.  StazOn is pretty amazing stuff! 


Please come back for another visit this weekend.  I am part of a two day fall and Halloween blog hop.  I hope to see you there! 

Thursday, September 6, 2012

It's been a circus around here...

I am the design team member posting on Cricut FANatics today.  Look at this cute card I made: 


Visit my post on Cricut FANatics to see many more pictures and details.  Thanks for stopping by! 

Monday, August 20, 2012

Best Wishes

A super-duper good friend of mine is about to get married!  Below is the card I made for her wedding shower:

My mom subscribes to Cardmaker magazine and in the September issue, there was an accordian Halloween card that I loved the layout of.  There are a lot of good ideas in that magazine! Here is my adaptation. The wedding papers are from an older Making Memories set I have.

The white ribbon is tied around the outside so after you untie it or slip it off, the card starts to open like this :

What I love about this is is looks like there is paper everywhere but when you open it up, there are still black squares and the paper is on opposite sides.

The rings and hearts are cut from Cricut's Everyday Pop-Up Cards cart.  The sentiment stamp is Fiskars.


Here is the entire card open.


I hope you like this card!  My friend did! :)

Saturday, June 16, 2012

Father's Day Cards 2012

Cricut is offering five free Father's Day card designs through June 19 in their online program, Cricut Craft Room (CCR).  Thank you Provo Craft for having these!  They were really easy to make.  This is also the first time I downloaded the desktop version of CCR and cut from it.  It was a fast download and cut on the first try.  I had absolutely no problems with it - joy!

Here are the two I made: (This card is standard A2)

I only did very minimal decoration to these cards.  On this one, I glittered the word "Greatest", inked "World's" and "Father" and added five brads along the bottom. 


And the second:  (This card is 5x5")

Some of the things I added to this cute golf card are a white brad for the golf ball, inking of brown (a bad job here I know - my StazOn brown is acting really weird...), and some Trendy Twine.


I hope all the dads out there have a wonderful Father's Day!!